
I live in Southern California, where it is relatively easy to recognize good outdoor light. Not so in Alaska, where we participated in our family's 2nd-ever reunion. With the skies overcast and the sun perpetually in the sky, it is sometimes hard to see the telltale shadows of where the good light is coming from. Furthermore, the camera has no idea that you’re shooting in difficult light (ain't that always the case!) – if you’re pointing the camera the wrong way, even if the scene looks great to your eye, it WILL give a horrible underexposure which, given the wide range of brightnesses already in outdoor scenes, is very, very difficult to compensate for later on.
I tackled this challenge by not employing any exposure compensation when taking the images – I didn’t want to risk any blown-out highlights at all. Instead I let the camera underexpose (as all camera exposure meters are wont to do with bright subjects) and then brighten them in Photoshop when I returned home.
I tackled this challenge by not employing any exposure compensation when taking the images – I didn’t want to risk any blown-out highlights at all. Instead I let the camera underexpose (as all camera exposure meters are wont to do with bright subjects) and then brighten them in Photoshop when I returned home.

Read on for more...
Perhaps needless to say, I shot in RAW so I had the most latitude in "fixing" the image. (Bringing out detail in the sky, for example).
Taking family pictures with such a bright and beautiful background proved even more challenging. If you’re exposing for the snow-capped peaks correctly, for example, then the light on your subject is insufficient. Using a flash usually can fix this problem by providing some local light for the subject, but when you do this in Program mode the camera tends to underexpose the background by about a stop, resulting in unnatural-looking images that don’t look at all like how you remember seeing it.

(Notice I used the pop-up flash and didn't remove my lens shade, as there's a small shadow on the bottom of the right image.)
There are many ways to solve this problem. One way is to spot meter for the background and invoke AEL (Exposure Lock). This will tell the camera not to try to underexpose anything -- use the AEL reading instead. Then set the Flash compensation to -1.5 or -1.7 so that it's not readily apparent that you used a flash.
In the examples below, the first image shows the result when you spot meter for the top center (the mountain range) and then hit AEL to hold that exposure. The 2nd picture is the identical exposure, with the flash turned on and on Auto. Notice how it really, really looks like a fill-flash was used! Setting the flash compensation to -1.7 (3rd picture) makes everything look balanced and natural.
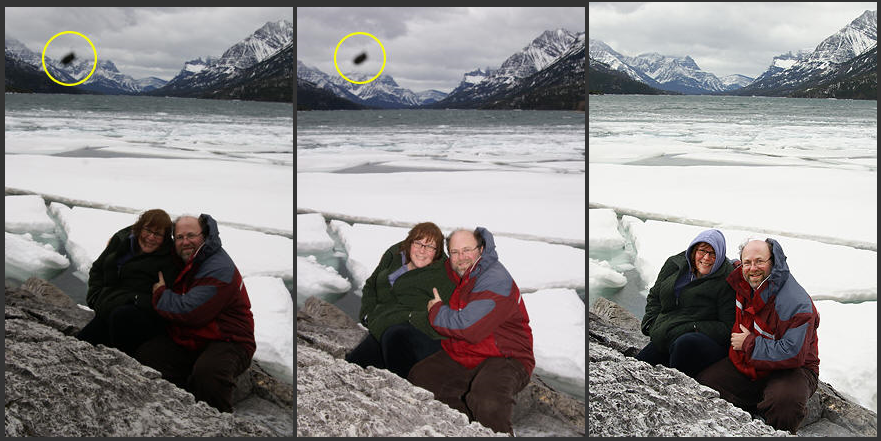
Now look at the big black spots in the yellow circles of the first two pictures. That is a giant piece of dust on the sensor! I can't think of a better way to communicate the idea of "ALWAYS clean your sensor before a major shooting (especially if it involves being outdoors!)".
==================================================
Florida and Nova Scotia seminars are open for enrollment! http://www.FriedmanArchives.com/seminars


No comments:
Post a Comment
Thank you for your comment! All comments must be approved by a moderator before they will appear.